
Client Testimonials
What people are saying 💬

Singer/Artist
My Work
Hear my recent work
I want to see your music grow.
Let’s feed those new listeners some songs with impeccable balance and crisp vocals. Mmm...yummy 😋

Frequently Asked Questions
Get your answers here.
Yes! If you need four or more songs mixed and mastered, let’s make a special deal!
Express Delivery is available for an additional 20% of your original cost. It guarantees that you’ll receive your song’s first mix within five days of sending your files. Note that mix revisions and masters may require additional time to complete.
Have other questions?
I have answers! Ask me about payment accommodations, my process, my favorite cheese, or anything else.

Contact
Nice to meet you!
If you’d like to get your song mixed and mastered or have any questions, let’s get in touch!
Mixing
Crisp vocals. Balanced tracks. Lots of love.
A well-balanced and creatively-enhanced mix will keep your listeners hooked.I will mix your individual tracks into ear-watering perfection, which includes...
Creating balance by adjusting levels & panning tracks
Making room for each element by applying EQ and dynamic processing
Tuning your vocals naturally and manually with Melodyne
Elevating your song by adding creative effects like reverb, delay, distortion, chorus, flanger, etc.
Creating emotional transitions and cool atmospheres by automating effects
Making other adjustments that will improve your song
What does it sound like?
Hear how good your song will sound after it's mixed and mastered!
What files will I get?
For each song, you'll get...
A high-quality WAV file
Unlimited revisions
A free master and TV track for your mix because I love you 🥰
What’s the process like?
Send me your mix request via email or Instagram DM. Let’s get to know each other!
Once we agree to work together, I'll send an invoice for the total amount. Please pay before I start mixing. I accept Zelle (preferred) and Venmo, and other methods are available on request.
Complete this form for each song. It requests important info like reference songs and your project’s deadline.
Follow these instructions to prepare your files for mixing.
I’ll send you the first mix via wetransfer.com. You can then make revisions, which you can learn about here.
When you're happy with the final mix, you can approve it for mastering (which comes free with every mix!). Then, I'll send you the final master via wetransfer.com. Time to let the world hear your new song!
I care about your music 😤❤️
So let me help you deliver high-quality sound to your hungry fans.

Mastering
Louder. Louder. Not too loud.
Mastering is the last step before sending out your music. It adds shine and glimmer to your track and boosts each element’s presence without distorting them or sacrificing dynamics.I will prepare your song for distribution by
Making each instrument and vocal clear
Maximizing volume while retaining dynamics and avoiding distortion
Ensuring your song sounds balanced in a playlist of similar songs.
What You'll Receive
For each song, you'll get...
A high-quality WAV file
Unlimited revisions
Ready to get a chart-breaking sound? 📈
Great! Let's get started.

Pricing
Save your time for creating.
I’ll handle the knobs and faders ⚡️
This is what you'll get and how much it costs!
| Most popular | |||||
| Master Supercharged for streaming. | Small Mix Great value. Great sound. | Regular Mix The Goldilocks package. | Medium Mix Better than small fries. | Large Mix Nice and chunky. | |
| Multitracks helpHow many tracks your song has | 1 | Up to 16 | 17-24 | 25-36 | 36+ |
| Price | $59 | $199 | $299 | $399 | $499 |
| Vocal Tuning helpManual vocal tuning with Melodyne | — | ✓ | ✓ | ✓ | ✓ |
| Free Master | — | ✓ | ✓ | ✓ | ✓ |
| Free TV Track helpA track with everything but the lead vocal or instrument | — | ✓ | ✓ | ✓ | ✓ |
| Revisions helpEach song ususally takes 2-3 revisions | Unlimited | Unlimited | Unlimited | Unlimited | Unlimited |
| Delivery helpThe time to get your first mix. I'll make it quick 😉 | 3-5 Days | 5-10 Days | 5-10 Days | 5-10 Days | 5-10 Days |
Ready to skyrocket your release? 🚀
Awesome! Let's get started.
Psst! If you need an EP or album (with four or more songs) mixed and mastered, or you are a nonprofit organization, let's make a special deal!
*A TV track is everything but the lead vocal or lead instrument used for live performances.
Preparing Files
How do I export and send my files?
To get your mix faster, please follow these six easy steps when preparing and sending your files for mixing:
Create a folder named “[Artist Name] - [Song Title] - Multitracks”, and export your song’s current demo mix to the folder as an MP3 or WAV file named “[Artist Name] - [Song Title] Demo Mix”.
Bypass all effects and automation on your tracks. Make sure no tracks clip (exceed 0 dB). If there’s a certain effect you want me to use in your mix, export it as an additional wet track. Note that vocals should always be dry and in mono if there is only one vocal layer per track.
Cross-fade all audio regions and remove unwanted noises like clicks, pops, etc. Don’t remove breaths or let vocals overlap on a single track. Order the tracks so that similar sounds are next to each other. Ensure every track is arranged and aligned correctly before exporting.
Number and label each track with a clear name (e.g., “01 Lead Vocals”), and export each track as a WAV file at its original bit depth (typically 16, 24, or 32 bit) and sample rate (typically 44100 or 48100 Hz).
Reimport the tracks into a new project to verify they reconstruct the song. Ensure that no tracks go over 0 dB, are muted, or are unintentionally wet.
Zip the main folder (containing the demo mix and dry tracks) and send it to [email protected] via wetransfer.com. If your song has lyrics, email me a lyric sheet with labeled song sections.
Ready to level up your sound? 📈
Perfect! I can help with that.
Making Revisions
Listen. Take notes. Communicate. Repeat.
Mix revisions are an essential part of the mixing process, allowing you to fine-tune and perfect your song to satisfaction. Here’s a guide on how to listen to your mix and write revision notes efficiently.
How do I listen to my mix?
Before writing your revision notes, listen to your mix effectively with these tips:
Listen in a quiet environment on speakers and headphones.
Test your mix on different devices like your phone, earbuds, laptop, and car speakers to see how each device portrays your mix.
Pay attention to the overall sound, and identify specific areas needing improvement.
Take notes during your listening session to ensure that all necessary changes are addressed.
How do I write revision notes?
Be specific and concise when writing revision notes. Here are some tips:
Specify instrument names or filenames (e.g., the lead synth or 07 Lead Synth.wav) when referring to a certain sound.
Group your comments by instrument type.
Provide a timestamp, lyric line, or song section when referring to a specific spot.
When necessary, refer to the demo mix and reference songs you provided. You can also provide examples (YouTube links with timestamps) of how you want a certain element to sound.
Here are some example revision notes by type:
Bring down the hi-hat by 1-2 dB during the chorus.
Bring down the piano’s high end during the second verse.
Pan the closed hi-hats 10% to the left and the open hi-hats 10% to the right during the pre-chorus.
Widen the stereo image of the snaps throughout the entire song.
Add a bit more distortion to the guitar during the chorus. Here’s an example at 1:24: [YouTube link].
Increase the modulation depth on the keys during the first verse.
Make the adlib pan slowly pan from left to right, starting at 2:03 and ending at 2:16.
Make the “pro-” in “You promised forever” snap to beat 1 of the measure at 0:34.
It's important to note that revisions are not meant to completely change the original mix, but rather to refine it and make small adjustments. By listening effectively to your mix and providing clear and specific revision notes, we can achieve your desired sound efficiently.
Ready to perfect your song? 💯
Great! Let's get started.
Blog
Need music production or mixing advice?
Here you go!
Here are some blog posts I wrote that will help you get better at producing and mixing!
Mixing
May 6, 2023
The only mixing chain you’ll need for pop and rap vocals

Vocals are one of the most important elements of a song. Here’s a sweet mixing chain to make your vocals achieve that glossy modern pop/rap sound.
Theory
April 28, 2023
This is the science behind your music.

As a producer or engineer, it’s important to understand the science and theory behind the magical power of music. In this article, we’ll dive into the technical aspects of music production and explore the science behind sound and how it’s represented digitally.
Mixing
April 7, 2023
5 spicy tips to mix your vocals like a pro

Ah, the human voice: so beautiful yet so complex. If you’re diving into vocal mixing, making your vocals pop while having them sit in the mix can be challenging. Don’t worry, though: I’ve got you covered with these five spicy tips to mix your vocals like a pro!
Studio Tips
March 30, 2023
How to give useful feedback to your mix engineer

Mix revisions are an essential part of the mixing process, allowing you to fine-tune and perfect your song to satisfaction. Here’s a guide on how to listen to your mix and write revision notes efficiently.
Blog > Mixing
May 17, 2023
The only mixing chain you’ll need for pop and rap vocals
Vocals are one of the most important elements of a song. Here’s a sweet mixing chain to make your vocals achieve that glossy modern pop/rap sound.
1. Vocal Correction
Before any dynamic processing, you want to correct your vocals. This process includes pitch and time correction. Two industry-standard plugins for vocal correction are Auto-Tune and Melodyne.
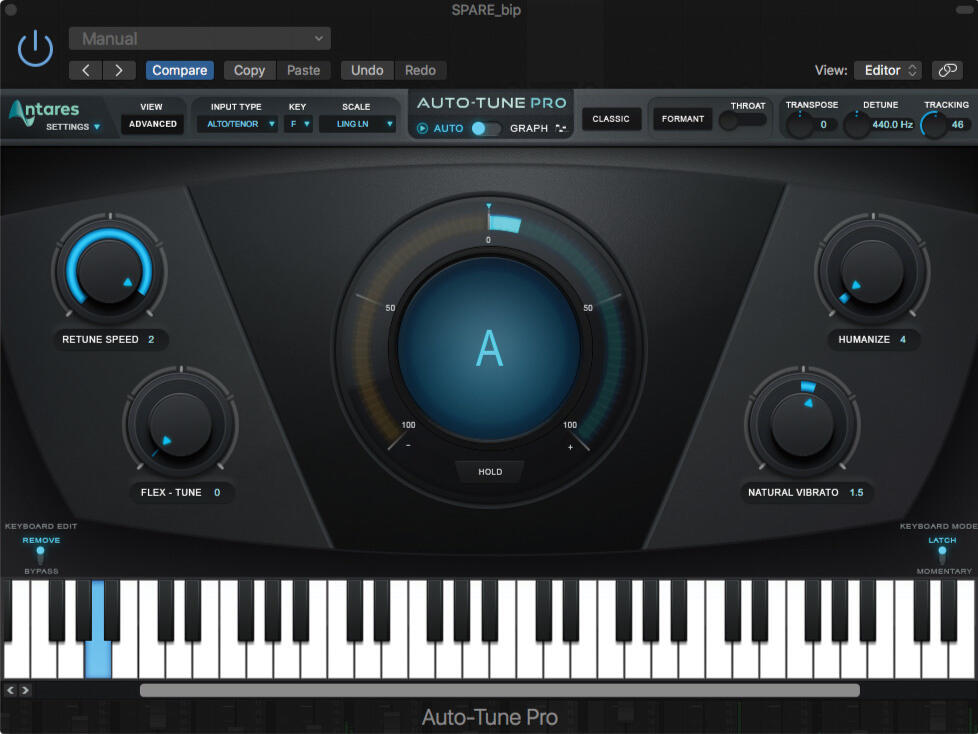
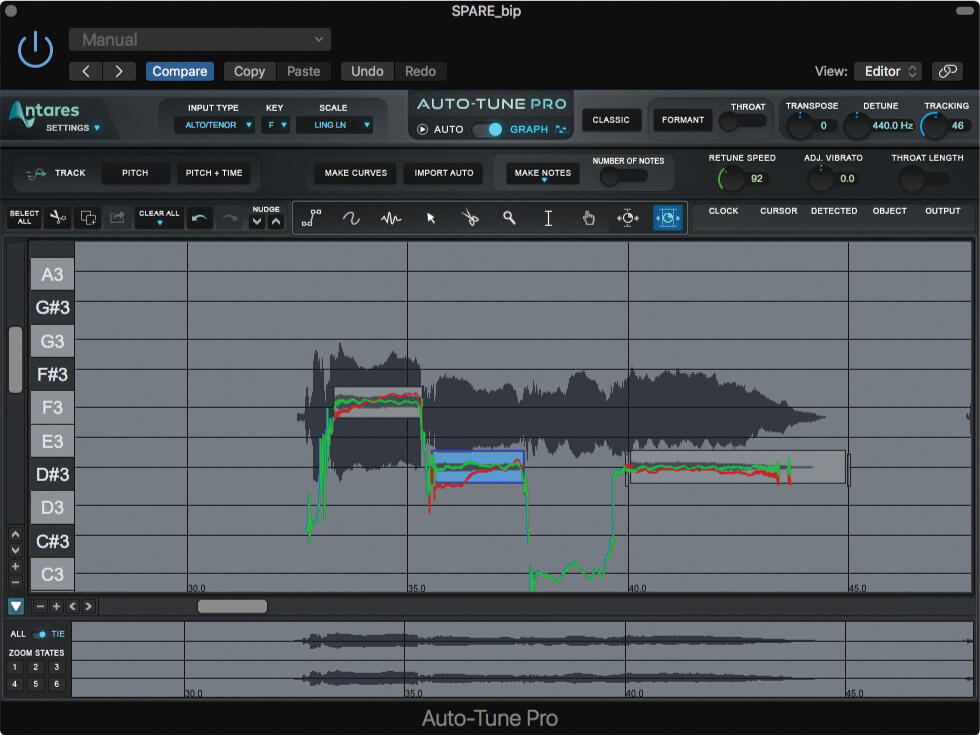
How Auto-Tune Works
Auto-Tune detects the pitch of the input signal and then adjusts the pitch based on your settings. Auto-Tune has two modes: Auto and Graph. Auto mode automatically adjusts pitch based on your selected key, input type, and retune speed. Graph mode opens a graphic editor and lets you control the pitch of each note.
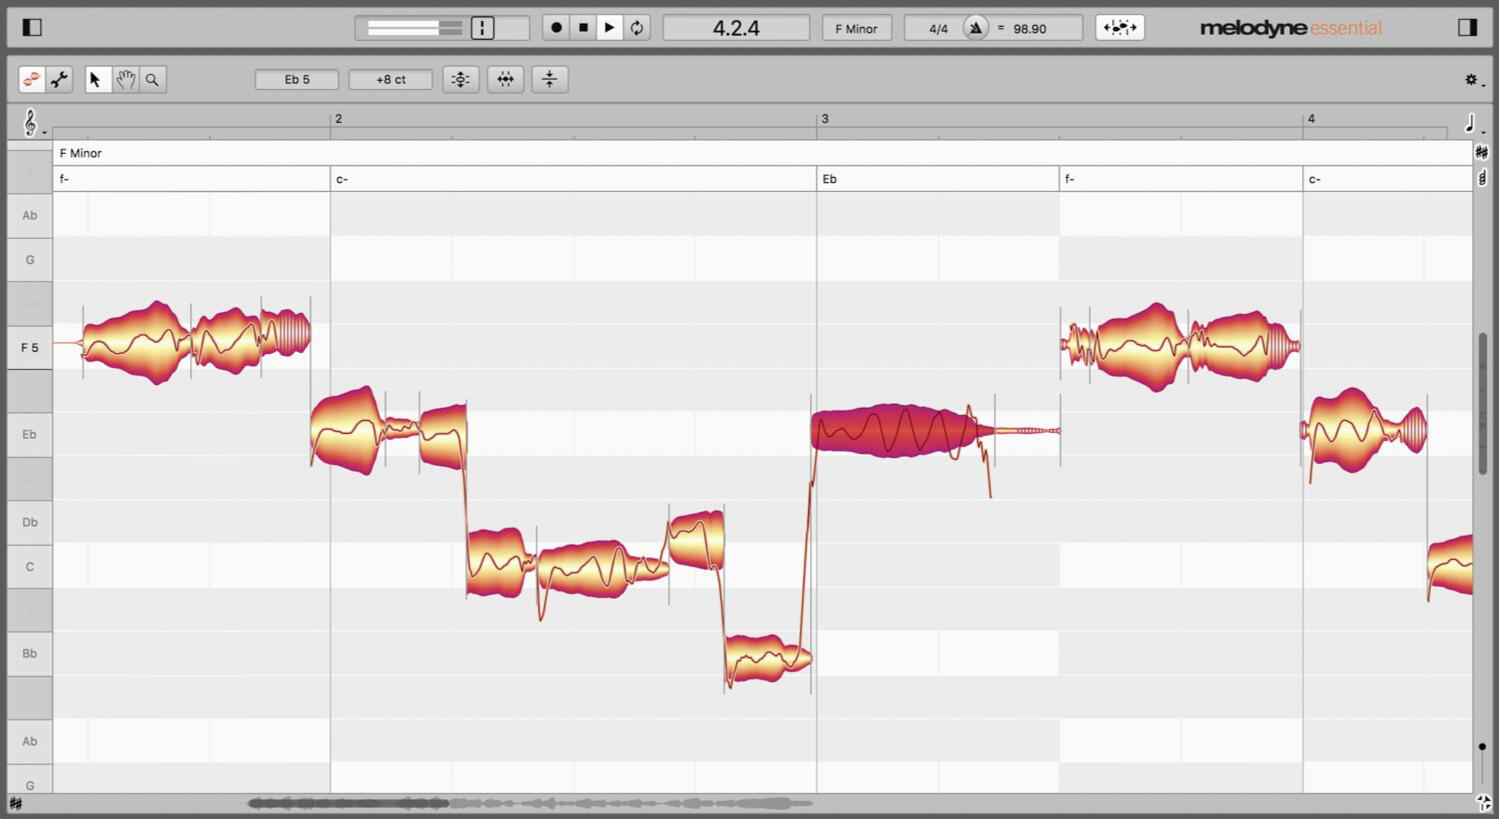
How Melodyne Works
Melodyne works by detecting the pitch of the input signal and then creating representational blobs in a graphic editor, sort of like MIDI notes in a piano roll. You can then adjust the pitch and timing of the blobs as you would MIDI notes. You can also adjust each note’s modulation, pitch drift, amplitude, formants, sibilance, and more.
Which one should I use?
Auto-Tune is popular for its robotic and snappy sound quality. It adds this sort of “electronic gloss” that gives your vocals the modern pop/rap sound (though, it can also sound natural with the right settings). Melodyne is popular for its natural-sounding correction and its detailed control for every note. Melodyne is also a great choice for tuning solo instruments like saxophones or violins, due to its modulation and polyphonic tuning features. Some people use Auto-Tune and Melodyne on the same track, using Melodyne to tune vocals naturally, and then applying Auto-Tune to add some electronic gloss.
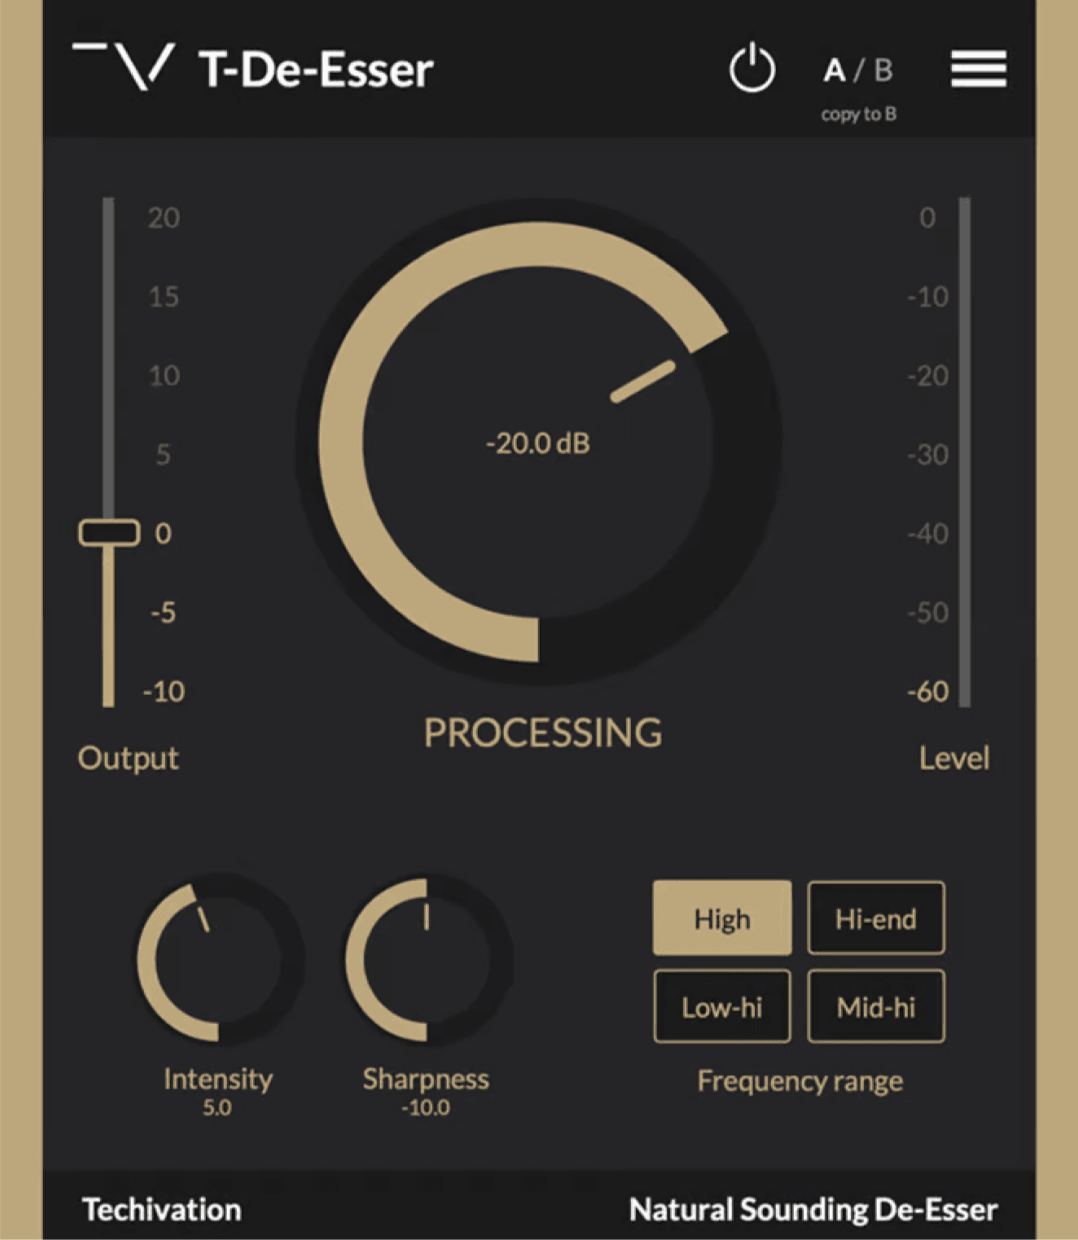
2. De-Essing
De-essing reduces sibilant consonants like "s", "z", "ch", "j" and "sh" in English. It’s important to use a de-esser to reduce these harsh consonants, as they can sound piercing and unpleasant after your vocals go through the rest of the mixing chain. One free and simple-to-use de-esser is Techivation’s T-De-Esser!
3. Subtractive EQ
This first EQ is used to cut unwanted frequencies from your vocals. One way to find these unwanted frequencies is sweeping. Sweeping involves increasing the gain and narrowing the Q of a single frequency band and moving that frequency band left and right through the entire spectrum to find harsh and resonant frequencies. Here are some frequency ranges with their attributed sound quality:
20-100 Hz: Rumble
100-300 Hz: Body and muddiness
500-800 Hz: Boxiness
800 Hz-1.5 kHz: Nasality
3-6 kHz: Presence
4-7 kHz: Sibilance
10-15 kHz: Air
A common mixing problem is muddiness due to the buildup of low frequencies from layering various instruments and sounds. Try reducing frequencies like 250 Hz to create more clarity in your mix. When you make cuts, be sure to cut narrow so that it doesn’t affect surrounding frequencies.
4. Compression
This step involves using two compressors. The first compressor targets the large peaks, and the second compressor smoothens the leftover peaks.
First Compressor
Use a compressor with a fast attack and release to catch the large peaks. Set the threshold so that the compressor catches the large peaks but not the body of the vocals. Aim for about 3-5 dB of gain reduction.
Second Compressor
After you’ve attenuated the peaks with the first compressor, your vocals will be much more tamed. This second compressor will smooth out the remaining peaks. Use a compressor with a slower attack and release for gentler compression.
5. Additive EQ
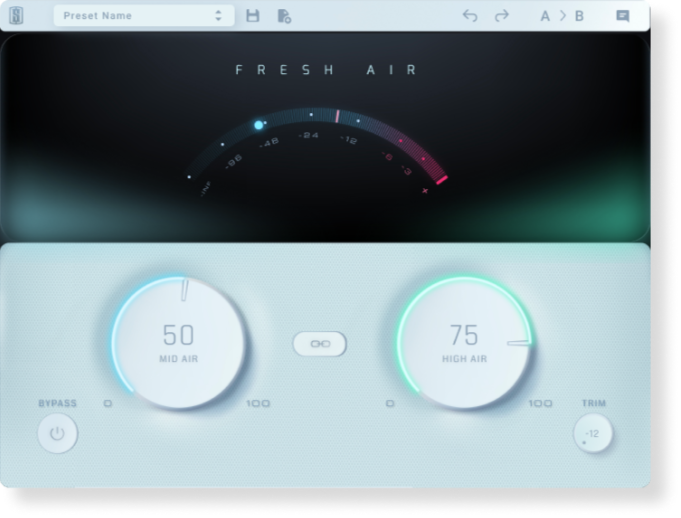
The first EQ in the chain cut out harsh and resonant frequencies. This second EQ is meant to add frequencies to enhance the sound, whether it’s adding warmth or air. One guideline I like to follow is to cut narrow and boost wide. In the subtractive EQ step, I recommended cutting narrow so that only the unwanted frequencies are removed. However, when boosting frequencies, it’s important to boost wide so that no specific resonances are created. Try boosting the 5-15 kHz range to add air to your vocals (Slate Digital’s Fresh Air plugin does an amazing job at this!). If your vocals sound thin, try boosting the 100-300 Hz range to add some warmth (or add a bit of saturation).
6. Reverb and Delay
Now it’s time to give your vocals some dimension. Adding reverb or delay (or both) to your vocals can make it sound like you’re in a large cathedral or a little room. Just make sure to create separate busses for reverbs and delays and sidechain them to the lead vocals to improve clarity.
7. Saturation
This last step is meant to add some fullness or crunch to your vocals. Saturation is a type of subtle distortion that compresses and adds harmonics to your signal. This adds warmth and grit to your vocals and can make it stand out in the mix.Well, folks…that’s the chain. Secret’s out!
Ready to level up your sound? 📈
Perfect! I can help with that.
Blog > Theory
May 15, 2023
This is the science behind your music.
As a producer or engineer, it’s important to understand the science and theory behind the magical power of music. In this article, we’ll dive into the technical aspects of music production and explore the science behind sound and how it’s represented digitally.
Sound Waves
Let’s start with the basics. Sound waves are the foundation of all music. They’re vibrations that travel through a medium, like air, and can be detected by the human ear and interpreted by the brain as sound. Sound waves have two main attributes: frequency and amplitude. Frequency refers to the number of times a wave vibrates per second, which determines pitch. Amplitude refers to the wave’s height, which determines intensity or loudness.

Interference
Interference is the phenomenon that occurs when two or more sound waves interact with each other. There are two types of interference: constructive and destructive.
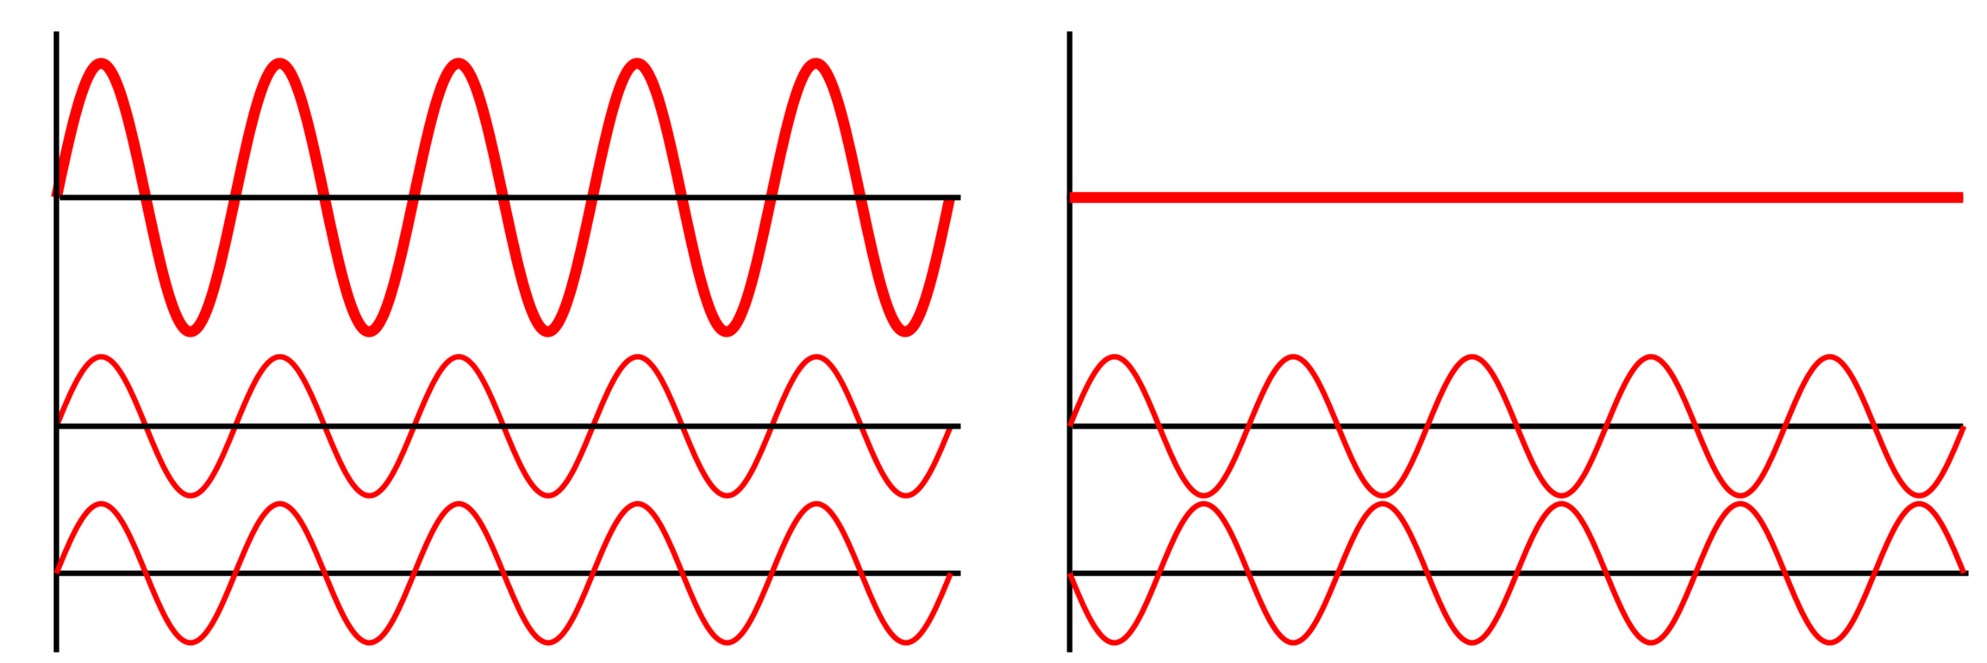
What’s constructive interference?
Constructive interference occurs when two or more waves are in-phase, meaning their peaks align and their troughs align. The amplitudes of the waves add up and result in a louder sound. Stadiums have several speakers that play sounds in unison. When the sound waves add up, it creates an illusion that there is one audio source, even though each speaker is playing its own stream of audio.
What’s destructive interference?
On the other hand, destructive interference occurs when two or more waves are out-of-phase, meaning their peaks and troughs cancel each other out. This can result in a quieter sound or even complete silence. Noise-canceling headphones use destructive interference to reduce background noise. The headphones detect the external sound waves and create a new sound wave that's intentionally out-of-phase, effectively canceling out the original sound.
The Harmonic Series
With sound waves and interference covered, it’s time to talk about why a note on the guitar sounds different from the same note on the French horn. Introducing…(drum roll, please)...the harmonic series!In music, the harmonic series is responsible for the unique tone and timbre of different instruments, objects, and voices. It’s a pattern that all natural sounds follow. Let’s say we pluck a string, and it produces a sound. When the string is plucked, it vibrates at a certain fundamental frequency. However, it simultaneously produces vibrations (pure sine waves) that are twice as fast, three times as fast, four times as fast, and so on. These multiples of the fundamental frequency are called harmonics. If the sound’s fundamental frequency is 100 Hz, the second harmonic would be 200 Hz, the third harmonic would be 300 Hz, the fourth harmonic would be 400 Hz, and so on. Through interference, the fundamental frequency and the harmonics interact to create a unique sound.
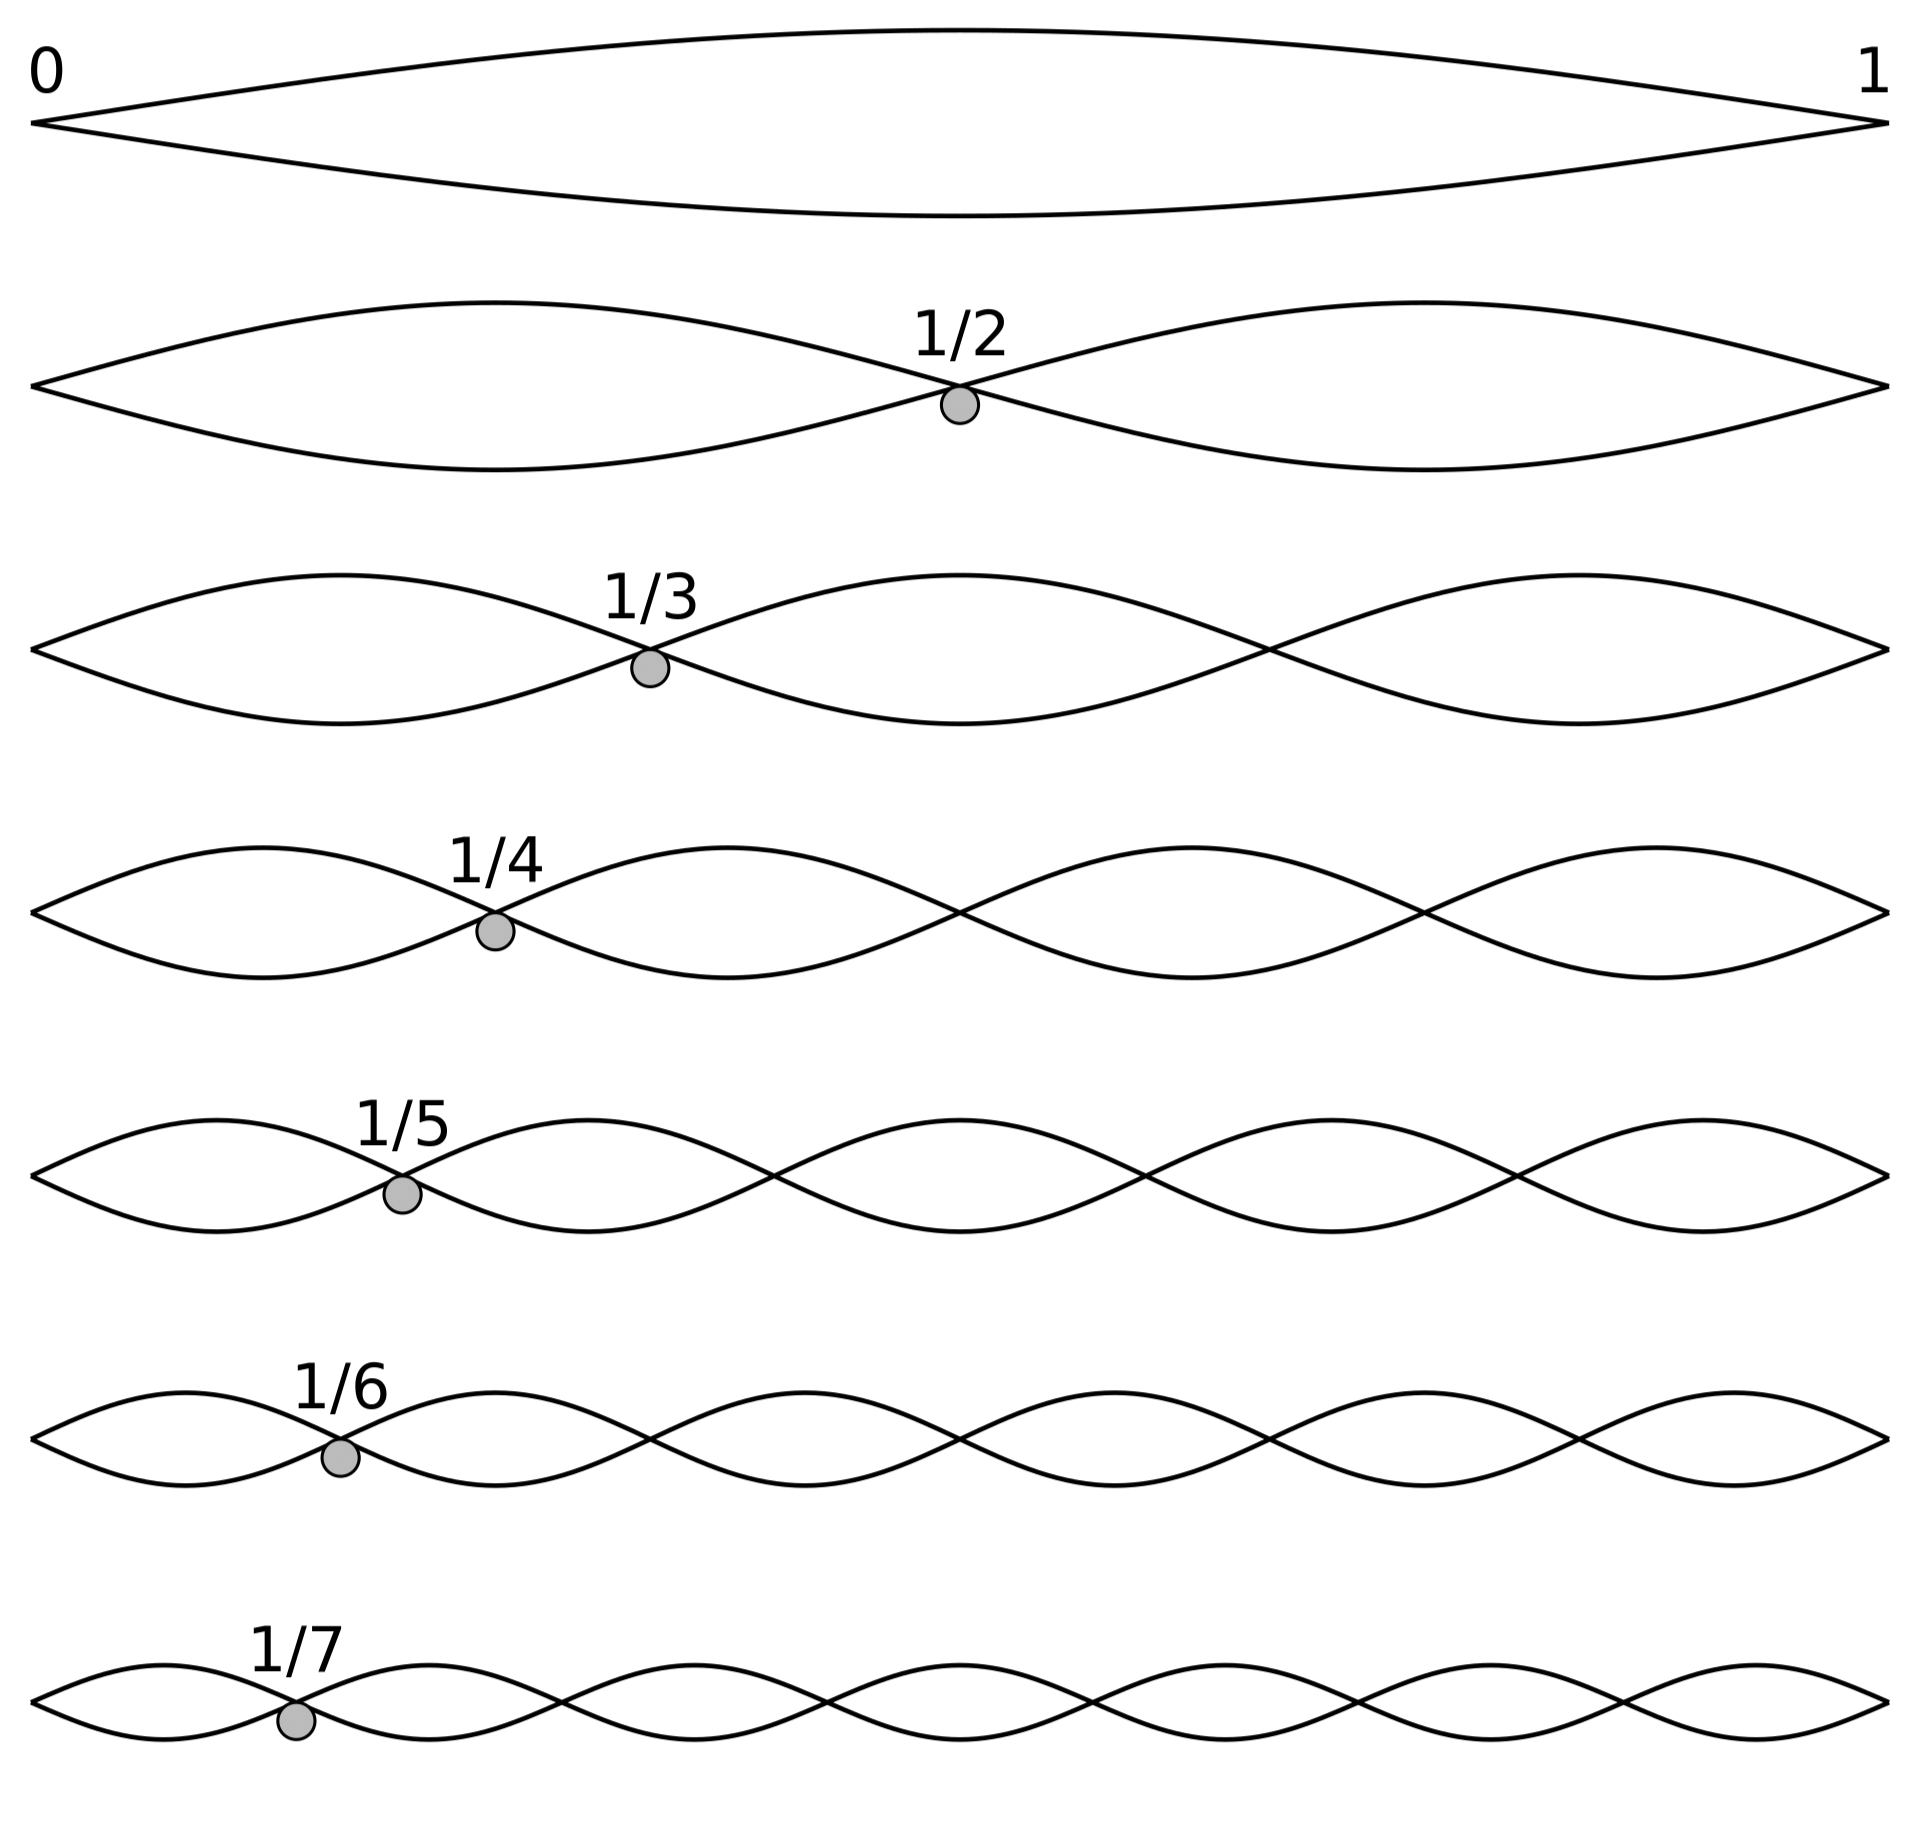
The only thing that makes a note on a guitar sound different from the same note on a French horn is how loud each harmonic is. That’s right—it’s that simple. A guitar and a French horn have different amplitudes for each harmonic, which explains why a guitar sounds tangy and tinny and why a French horn sounds warm and round.By understanding the harmonic series, you can manipulate the frequencies of your sounds (with an EQ, perhaps) to achieve your desired tone.
Digitally Representing Sound
In modern music production, sounds are often recorded and edited digitally. Digital audio is represented as a series of numbers that correspond to sound waves. Two important attributes of digital sound are sample rate and bit depth.
What’s sample rate?
Sample rate refers to the number of samples taken per second when recording or playing back digital audio. Each sample is a snapshot of the sound wave at a specific moment in time. The more samples taken per second, the more accurately the digital representation matches the original sound wave.

How does sample rate affect sound quality?
Sample rate also determines the frequency range that can be accurately captured. The Nyquist-Shannon sampling theorem states that the sample rate must be at least twice the highest frequency present in the sound wave in order to capture it accurately. For example, a 44.1 kHz audio file can represent frequencies up to 44100/2 or 22.05 kHz. Since human hearing ranges from 20 Hz to 20 kHz, this sample rate is perfect for consumer audio. A higher sample rate means that more high-frequency content can be captured, resulting in a more accurate representation of the original sound.If your file used a lower sample rate like 8 kHz (which is used for telephones and walkie-talkies), the highest frequency represented would be 4 kHz. If an 8 kHz file contains high-frequency content such as cymbals or string harmonics, this sample rate would not capture the nuances of those sounds accurately.
What is bit depth?
In real life, a sound’s amplitude can vary infinitely. In digital audio, however, amplitude must be quantized into a finite number of levels, which is where bit depth comes in. Bit depth refers to the number of bits that represents each sample. A higher bit depth means that there are more levels available to represent the amplitude of the sound wave, resulting in a smoother, more accurate representation.
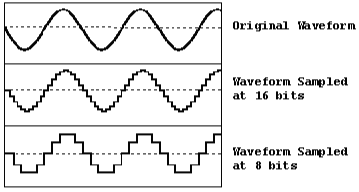
How does bit depth affect sound quality?
For example, an 8-bit audio file can represent 28 or 256 different levels of loudness, while a 24-bit audio file can represent over 224 or 16.7 million different levels. If a sound is recorded with a low bit depth, such as 8 bits, it will sound distorted and grainy because there are not enough levels to accurately represent the sound wave. On the other hand, if the same sound is recorded with a higher bit depth, such as 24 bits, it will sound more natural and dynamic because there are more levels available to accurately represent the sound wave.However, higher sample rates and bit depths require more storage space and processing power, which is why lower sample rates and bit depths are often used for streaming and file compression. The standard for streaming (AKA CD quality) is 16-bit at 44.1 kHz. I personally work with 24-bit, 48 kHz audio, which is a good compromise between quality and storage space.
Conclusion
So, there you have it: a brief overview of the science behind your music. By understanding the technical aspects of sound waves, interference, the harmonic series, and digital representation, you can take your music production skills to the next level. Happy producing!
Ready to level up your sound? 📈
Perfect! I can help with that.
Blog > Mixing
April 14, 2023
5 spicy tips to mix your vocals like a pro
Ah, the human voice: so beautiful yet so complex. If you’re diving into vocal mixing, making your vocals pop while having them sit in the mix can be challenging. Don’t worry, though: I’ve got you covered with these five spicy tips to mix your vocals like a pro!
Tip 1: Close your eyes.
You know those super useful graphs on parametric EQs? Try turning them off. It might seem harder to mix without a visual aid, but it trains you to rely on your ears rather than your eyes, which can result in better mixes.Another trick is to hover your cursor over the bypass button and close your eyes, clicking randomly a few times. Then, while still keeping your eyes closed, click a few times and try to tell whether the bypass is on or off. Closing your eyes reduces the visual stimuli your brain needs to process, which lets you focus more on your hearing. It’s like how closing those 237 tabs on Chrome makes your DAW run faster.
Tip 2: Don’t go solo! Listen to your whole mix.
We’ve all been there, vibing to the sweet sound of our vocals in solo. But here’s the thing: your mix is a team effort. You want to make decisions that make the entire team sound like rock stars, not just Brad (sorry, Brad!). Making adjustments based only on how your isolated vocals sound can lead to some serious weirdness once you un-solo. Plus, no one is ever going to listen to your individual tracks—so mix in a way that simulates what your lovely audience is going to hear.(Pro tip: if you’re trying to find resonant frequencies, go ahead and do an EQ sweep while soloed. But when it comes to the final decision, always listen to the whole mix.)
Tip 3: EQ and sidechain your vocal reverb.
Adding reverb to your vocals can make them nice and dreamy, but it can also cause the vocals to get lost in the mix, especially when working on sad songs with big vocals and Adele-type piano arrangements.Here’s how to tame your reverb and keep your vocals front and center:
Send your vocals to a bus with a 100% wet reverb setting. This will let you control the dry and wet signals separately, giving you more flexibility in your mix. Think of reverb as its own element in the mix, not just an effect.
Start by high-passing your reverb at around 400-500 Hz and low-passing at around 4-5 kHz. This will help prevent any unwanted muddiness or harshness from building up. Trust your ears and adjust the frequencies as needed.
Add a compressor to your vocal bus and set the sidechain input (or "key input") to the dry vocals. This will make the compressor turn down the reverb whenever the dry vocals are loud enough. Think of it like when your voice assistant gives you map directions and your car's music turns down—it lets you hear where your next turn is.
These techniques will let you add reverb—large or small—to your vocals and keep them sounding nice and clear. Enjoy!
Tip 4: Remove the rumble.
Vocals contain some low-end frequencies, which creates unnecessary buildup when layered, resulting in a boomy and uncool mess. This is because bass frequencies have more power than higher frequencies at the same perceived loudness, as illustrated by the Fletcher Munson Curve, a fancy graph that shows how our ears hear different frequencies at different volumes.
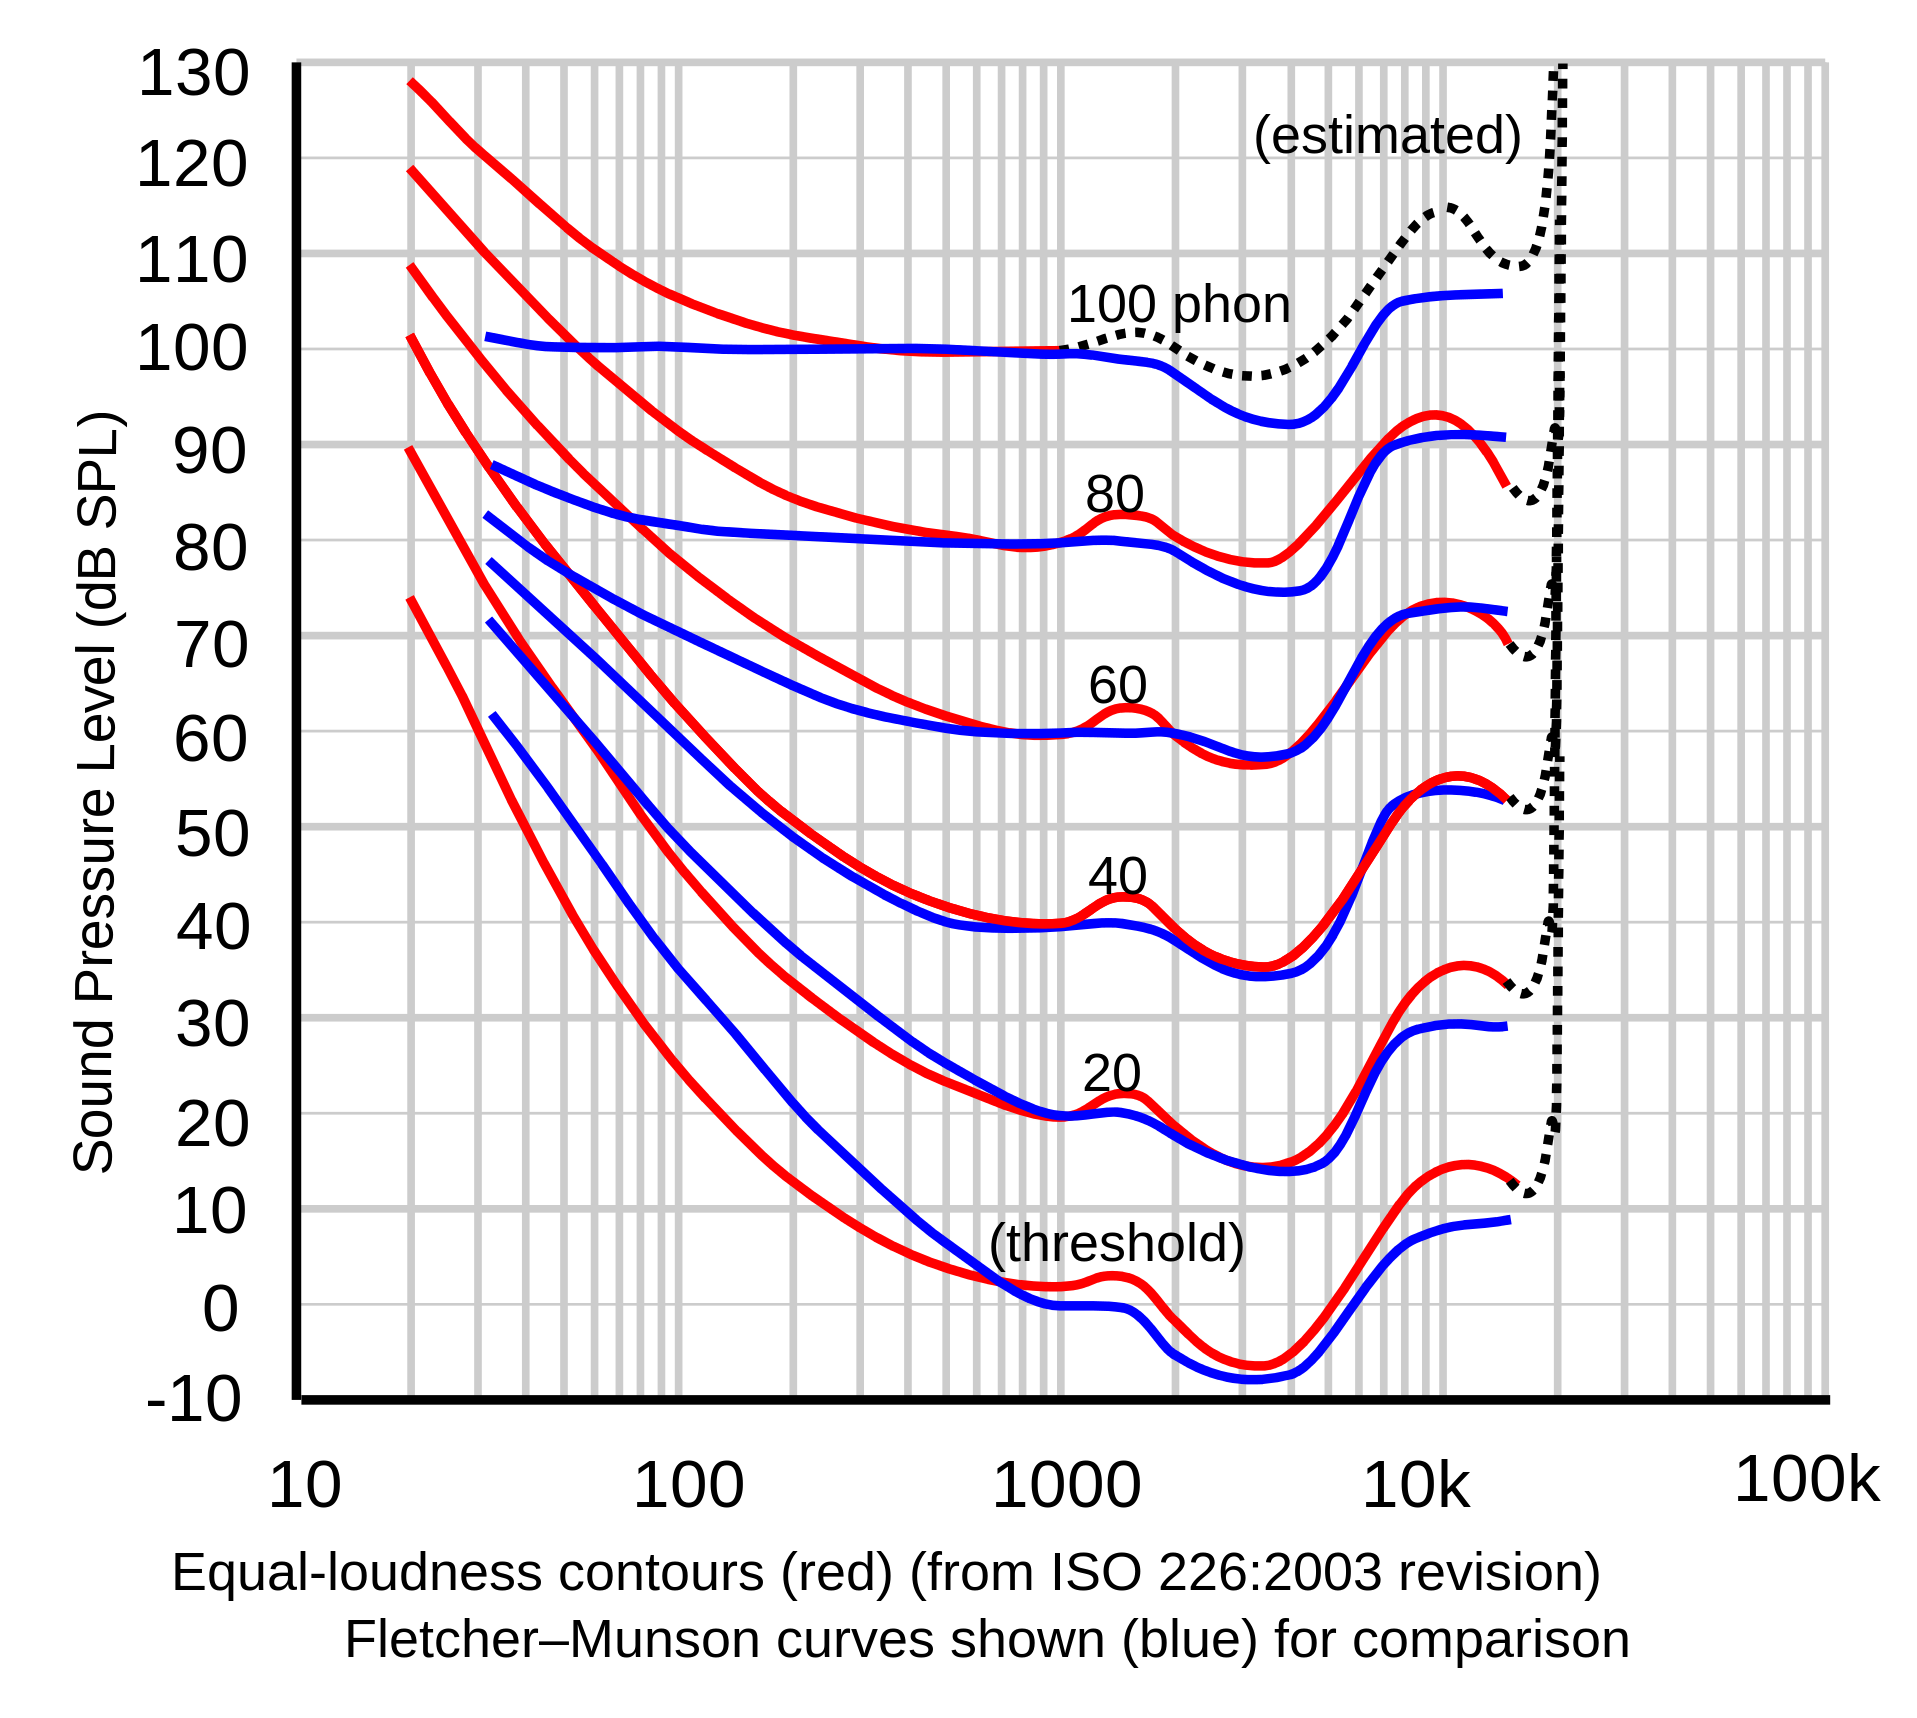
To remove the rumble, high pass your vocals at around 80-100 Hz. This will get rid of any bass that's not adding to the overall quality while still keeping some warmth and richness. Of course, there's no one-size-fits-all solution for every vocal and mix, so, as I always say: TRUST YOUR EARS!
Tip 5: Clean up the mud (it gets icky fast).
Similar to rumble, muddiness (200-500 Hz) can build up faster than I can detect lasagna from the first floor while working in my basement studio. This is usually due to vocals being recorded in small rooms or due to the proximity effect, which explains why your vocals are boomier when you’re closer to the mic.

Shure Beta 57A Frequency Response Graph With Proximity Effect Variations
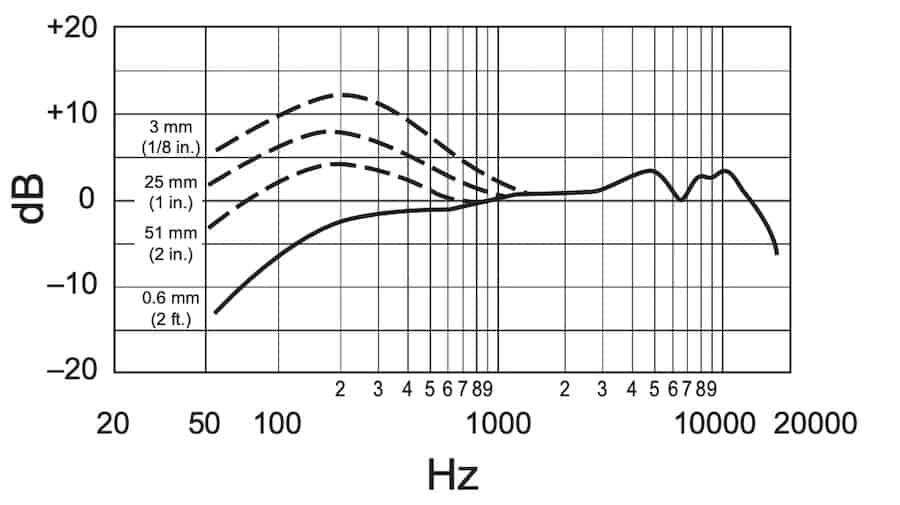
Reducing your vocals’ low-mids (250 Hz is a good starting point) can help clean up muddiness. Also consider making a gentle wide cut to other instruments in the 100-400 Hz range to make more space for your vocals.By reducing these icky frequencies, you can create a cleaner sound and more space, giving your vocals the spotlight they deserve. And as an added bonus, you can enjoy your lasagna without the distraction of a muddy mix. Mmm…
To sum it all up…
Rely on your ears while mixing, not your eyes.
Listen to the whole mix, not a soloed track when making decisions.
Send your vocal reverb to a separate bus, and apply EQ and sidechain compression to keep your vocals front and center.
Cut out anything less that 80-100 Hz to remove rumble.
Reduce your low-mids (250 Hz as a starting point) to clean up muddiness.
Hope this helps!
Ready to level up your sound? 📈
Perfect! I can help with that.